- 1-807-228-1532
- support@dnb3d.ca
Free shipping on orders over $175
New Products added Daily
Ready to Ship | Seasonal Gifts | Custom Orders
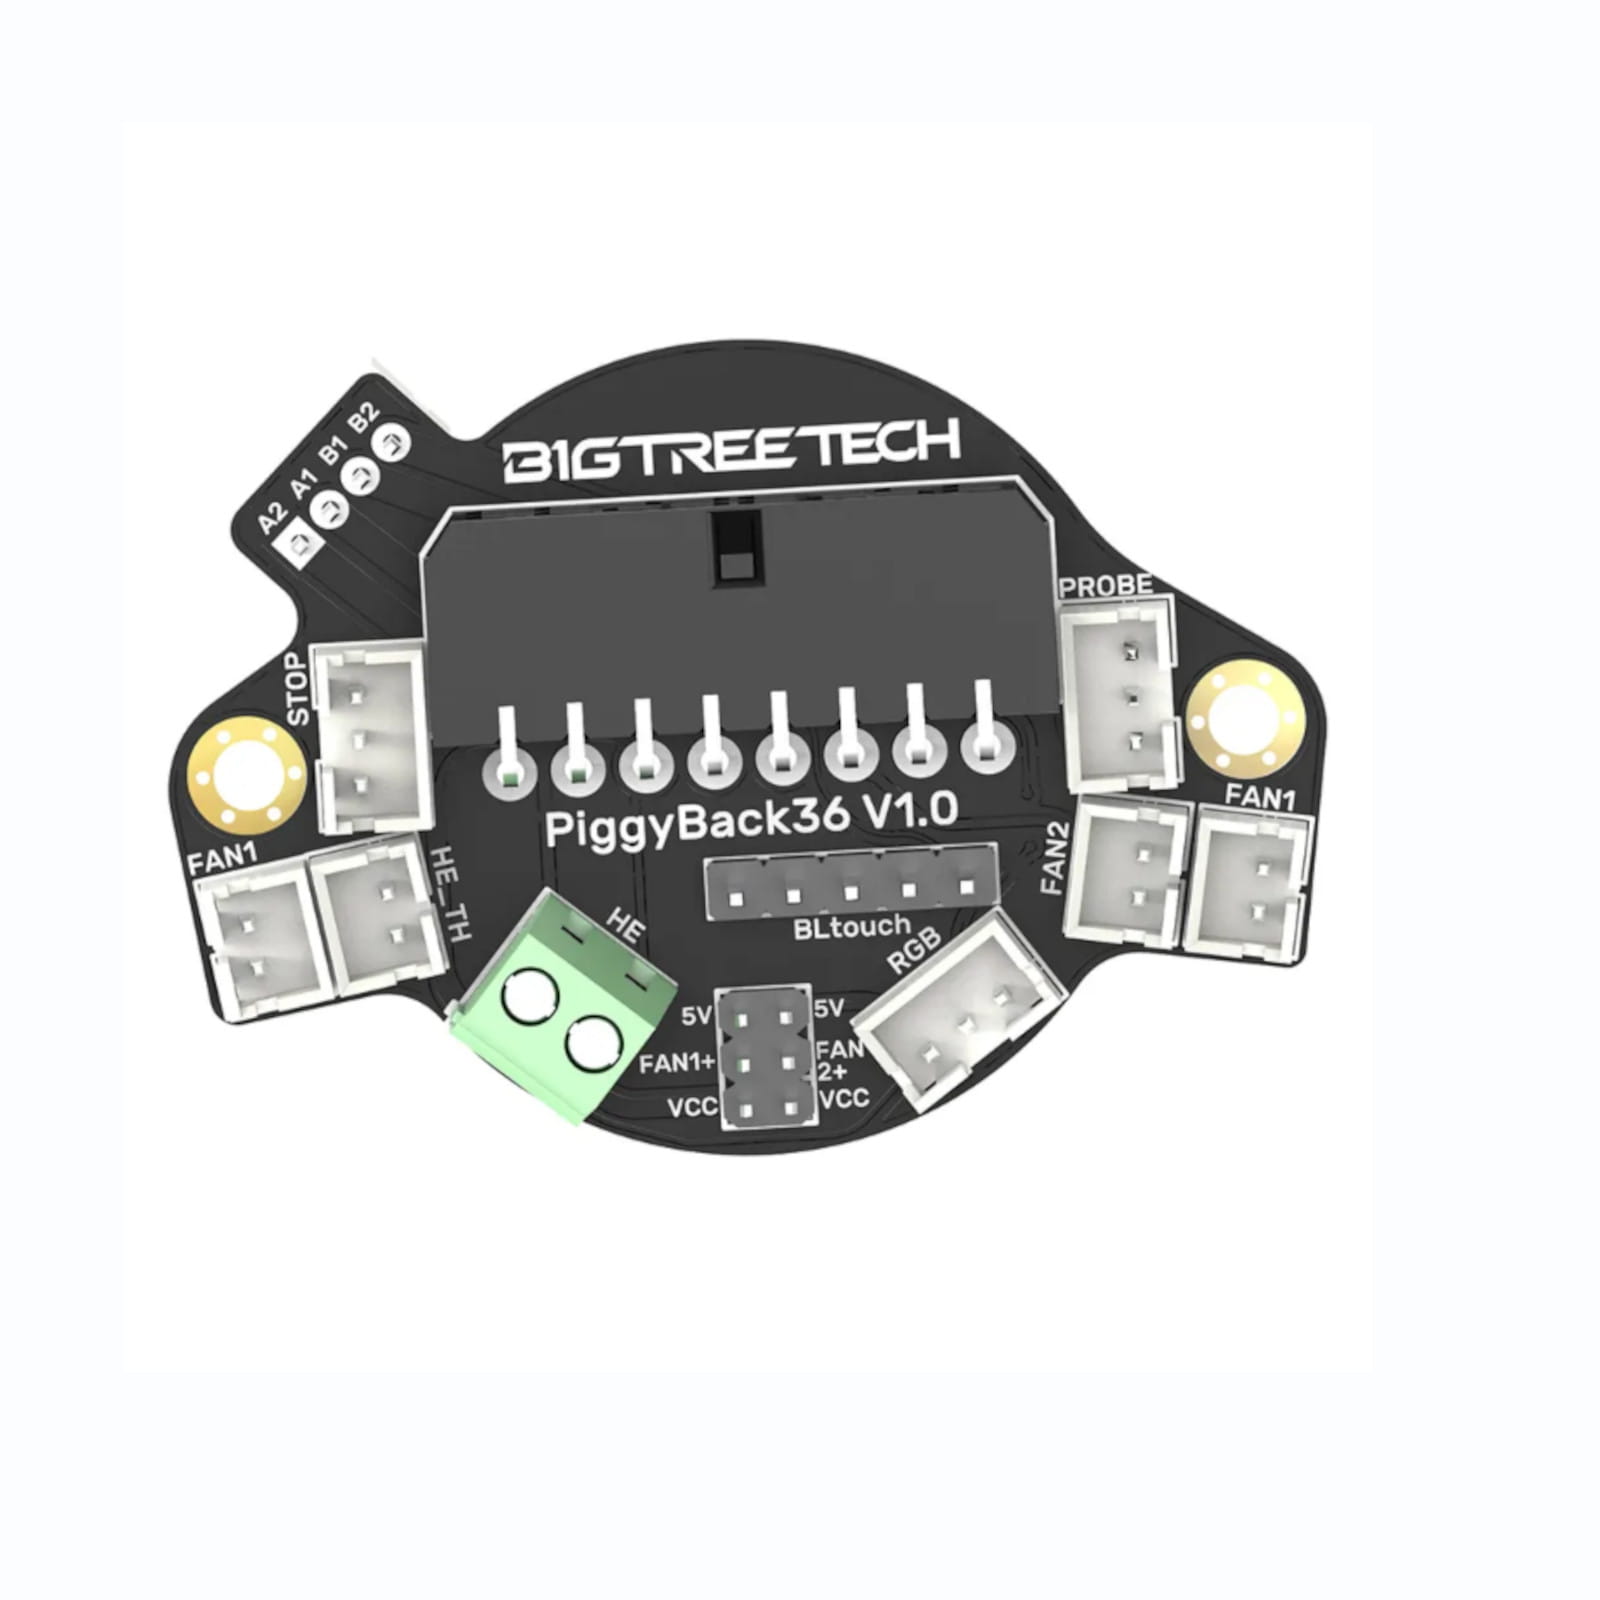

The PiggyBack 36 V1.0 PCB is a 3D printer toolhead wiring management board designed to simplify wiring between the printer control board and the toolhead. It helps organize common toolhead connections such as fans, RGB LEDs, probes, endstops, and stepper motor wiring into a cleaner PCB-based layout.
Your current dnb3D product page lists the PiggyBack 36 V1.0 PCB as a wiring management module that connects to the back of both NEMA14 36mm pancake stepper motors and NEMA17 42mm stepper motors. This makes it more universal than Stealthburner-specific PCB layouts, while still serving a similar purpose: reducing wiring clutter and making toolhead connections easier to manage.
The PiggyBack 36 V1.0 PCB is useful when a builder wants cleaner toolhead wiring without being locked into one specific printed toolhead design. It can mount to compatible 36mm and 42mm stepper motors, making it suitable for multiple extruder and toolhead configurations depending on the printer design, motor style, and available mounting clearance.
This board is similar in purpose to a toolhead PCB, but it is different in style and mounting. A 2-piece HartK-style Stealthburner PCB is designed specifically around the Voron Stealthburner toolhead layout. The PiggyBack 36 V1.0 PCB is more universal and mounts around the back of compatible stepper motors, making it useful for builders who want toolhead wiring management across different machine layouts.
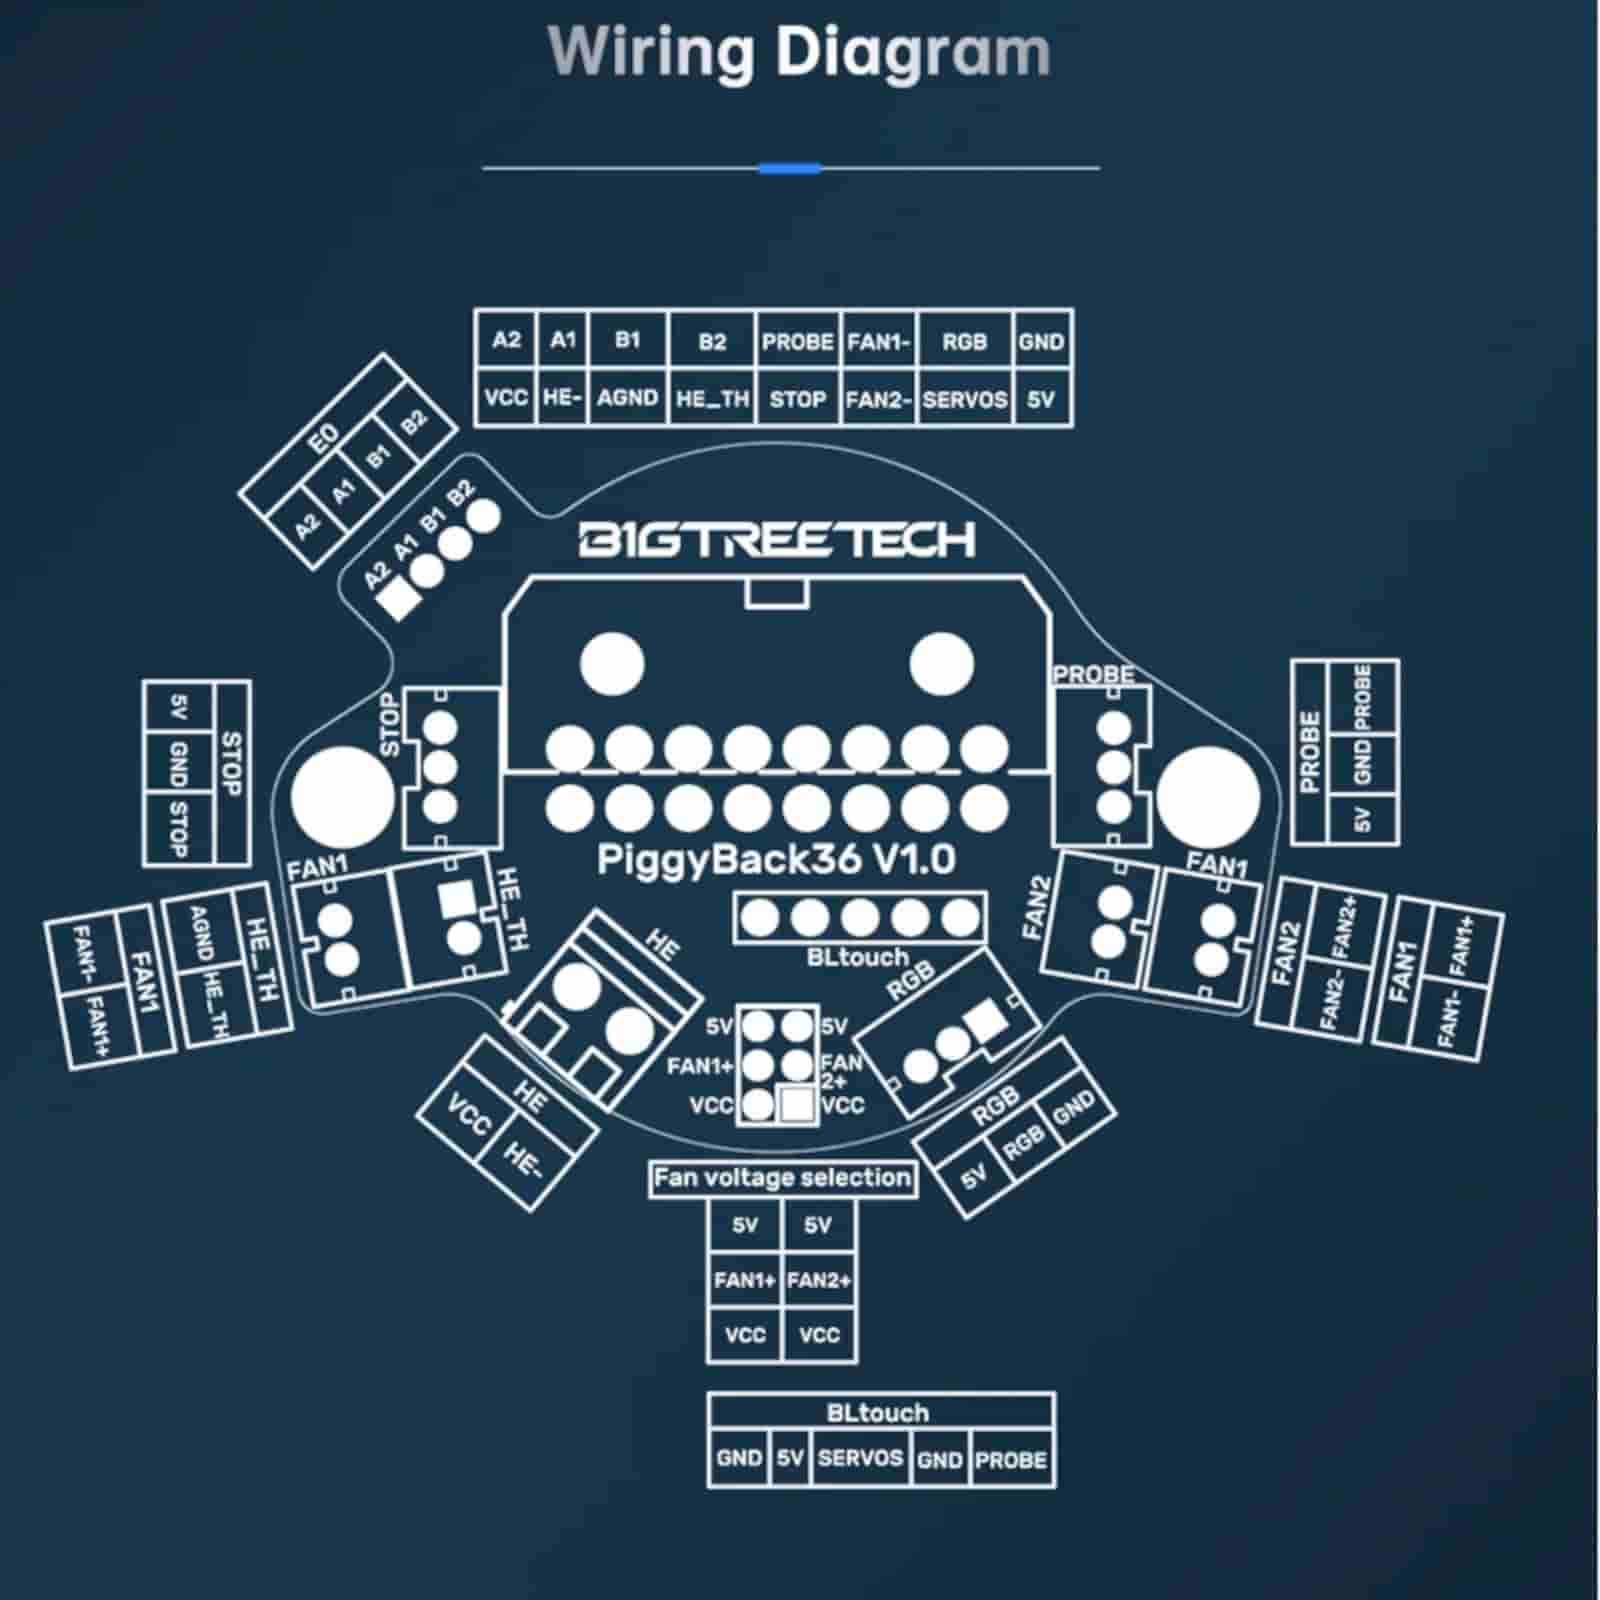
The board includes support for common 3D printer toolhead wiring needs, including 2 fan ports, 1 endstop port, an RGB LED port, BLTouch and inductive probe ports, and 1 stepper motor port. It uses JST-XH connectors and includes a 5V or VCC DC voltage option according to the product page.
The PiggyBack 36 V1.0 PCB can help support cleaner tool swaps between multiple toolhead configurations. By moving toolhead connections to a dedicated PCB, builders can reduce loose wiring, simplify maintenance, and make it easier to service or change toolhead setups when the printer design supports it.
Your current product details list this as a gold plated PCB. Gold-plated contact surfaces can help provide clean electrical contact points when used with compatible connectors and proper wiring practices. As with any toolhead wiring board, correct pinout, strain relief, and secure connector installation are important.
This board is useful for custom 3D printers, RatRig-style builds, Voron-style projects, BLV Cube-style machines, CoreXY printers, Cartesian printers, extruder upgrades, toolhead rebuilds, and general 3D printer wiring cleanup. It is especially helpful when a printer has multiple toolhead wires running through a cable chain or umbilical-style wiring path.
For related parts, browse the 3D Printer Parts category or the Electronics category. This PCB can be paired with fans, probes, RGB LEDs, stepper motors, hotends, extruders, wiring, connectors, and other toolhead hardware from dnb3D.
Toolhead wiring PCBs must be wired according to the correct board pinout and controller configuration. For reference materials, firmware notes, and official board documentation, see the BigTreeTech GitHub documentation.
Every order is hand-inspected and precision-shipped from dnb3D in Marathon, Ontario. Whether you are cleaning up toolhead wiring, building a custom printer, or setting up multiple toolhead configurations, this PiggyBack 36 V1.0 PCB provides a practical wiring management board for compatible 3D printer builds.

The PiggyBack 36 V1.0 PCB is a 3D printer toolhead wiring management board designed to organize wiring between the control board and toolhead components.
| Product Type | 3D printer toolhead wiring PCB / wiring management board |
|---|---|
| Model | PiggyBack 36 V1.0 PCB |
| Main Function | Wiring management from 3D printer control board wiring to toolhead components |
| Mounting Style | Mounts to the back of compatible stepper motors |
| Compatible Motor Mounting | NEMA14 36mm pancake stepper motors and NEMA17 42mm stepper motors |
| Input Voltage Option | 5V or VCC DC voltage option |
| Fan Ports | 2 fan ports |
| Endstop Port | 1 endstop port |
| Connector Type | JST-XH connectors |
| RGB LED Port | Yes |
| Probe Ports | BLTouch and inductive probe ports |
| Stepper Motor Port | 1 stepper motor port |
| PCB Finish | Gold plated PCB |
| Toolhead Use | Supports cleaner wiring and optional quick tool changes between multiple compatible toolhead configurations |
| Common Applications | 3D printer toolhead wiring, DIY printer builds, custom toolheads, cable-chain wiring cleanup, fan wiring, probe wiring, RGB wiring, endstop wiring, and stepper motor wiring |
| SKU | DB-0048-5853 |
| Installation Warning | Confirm board pinout, voltage selection, connector orientation, controller-board compatibility, probe wiring, fan voltage, RGB wiring, and stepper motor wiring before powering the printer. |
| Fulfillment | Hand-inspected and precision-shipped from dnb3D in Marathon, Ontario, Canada |
Before installing the PiggyBack 36 V1.0 PCB, confirm the board pinout, connector orientation, voltage selection, and controller-board wiring. Do not assume wire colours or connector positions are universal across different 3D printer builds.
This PCB is designed to connect to the back of compatible NEMA14 36mm pancake stepper motors and NEMA17 42mm stepper motors. Check motor size, screw pattern, connector clearance, toolhead geometry, and available space before installation.
The board supports a 5V or VCC DC voltage option according to the product page. Confirm the correct voltage for fans, RGB LEDs, probes, and controller inputs before applying power. Incorrect voltage selection can damage toolhead electronics.
The board uses JST-XH connectors. Use properly crimped connectors, correct wire gauge, and secure plug orientation. Loose crimps, reversed connectors, or poor strain relief can cause intermittent faults, failed fans, probe errors, or damaged electronics.
After wiring, test each circuit individually before running the printer. Confirm fans, RGB LED, endstop, probe, and stepper motor wiring before heating the printer or starting motion. This reduces the chance of damaging a board or toolhead component due to wiring mistakes.
Route wires away from hotends, heater blocks, moving belts, pulleys, fans, sharp frame edges, and pinch points. Use strain relief so connectors are not pulled during toolhead movement. Toolhead wiring should move smoothly through a cable chain or umbilical path without tight bends.
This PiggyBack board is more universal and mounts to compatible stepper motors. If you are building a Voron Stealthburner-specific setup, compare it with a dedicated Stealthburner toolhead PCB before deciding which board layout best fits your toolhead, wiring plan, and printed parts.
Keep the PCB free from dust, metal chips, filament strings, oil, moisture, and loose hardware. Avoid touching contacts unnecessarily and do not allow metal tools, screws, or loose strands of wire to short pads or connectors.
Every order is hand-inspected before shipping. dnb3D precision-ships PCBs, electronics, wiring components, and 3D printer parts across Canada from our Ontario facility, helping makers, builders, and printer owners receive clean, usable parts ready for careful installation.
At dnb3D, we don’t just ship boxes—we manufacture solutions. Operating our Industry 4.0 micro-factory in Marathon, Ontario, means your order is handled by the same people who design and test these components.
Ready to Ship (3D Printer Parts & Hardware): Finished, inspected, and on the shelf. Dispatched within 1 to 2 business days.
In-House Manufacturing (Laser, Plasma, 3D Prints): These items are manufactured “fresh” to order. Please allow 3 to 5 business days for precision cutting and finishing.
Custom Projects: Bespoke designs require a consultation and a locked-in timeline before production begins.
We ship nationwide across Canada and the USA. Centrally located on the North Shore of Lake Superior, we are uniquely positioned to get your products moving quickly to either coast.
We stand behind every weld, cut, and print. If a product doesn’t meet your expectations, contact the Hub within 30 days. If we wouldn’t put it in our own shop, we won’t let it sit in yours.
Standard Items: Contact us within 30 days for return authorization. Items must be in original, unused condition.
Custom/Personalized Orders: Digitally fabricated to your exact specs (names, custom dimensions, or unique finishes) are final sale once production begins.
Shipping Costs: Return shipping is the responsibility of the customer unless the item arrived damaged or defective.
Have questions about a specific build? Click here to contact the shop.